Lecture 1: NoSQL Database
NoSQL Databases do not organize data as tables linked by PK-FK relations. Instead, they may use one of the following data models:
- Document Model (e.g., MongoDB)
- Graph Model (e.g., Neo4j)
- Key-value pair (e.g., Amazon Dynamo DB)
Why NoSQL: prevalent use of small devices and distributed systems of apps requires flexible data structure, big data, high demand for availability.
- scalable horizontally: not need to change data structure in order to add new data fields
- optimized for a specific data model with comprises:
- basic availability
- soft state
- eventual consistency
NoSQL Database Examples (MongoDB, Neo4j, DynamoDB, CouchDB, etc.)
CAP Theorem: Any distributed system can satisfy only two of the three properties: consistency, availability, and partition tolerance. This theorem classifies NoSQL databases into three categories.
ACID Properties guarantee data validity despite errors and failures.
Lecture 2: Graph Database Neo4j and Knowledge Graph
- JSON documents for node and relationship properties
- Graph Data Models:
- nodes (nodeName:NodeType{JSON document}
- relationships: (node) -[:RelationshipName{JSON document}->(node)
- Neo4j Installation:
- Query graph databases:
MATCH (subject)-[:verb]->(object)
where [criteria on subject, relationship, and/or object properties
RETURN subject, relationship, object;
- Knowledge Graph and Graph RAG:
- Vector search: RAG is based on vector search or search based on the similarity of meaning
- Graph search: search based on both node and path similarities. For RAG, it can find not documents that have tokens matching the meaning of the tokens in a query, but also the exact match of the nodes, related nodes, and relationships that provide the context and explanation to the query result by an LLM.
Lecture 3: MongoDB Data Model
- A database is a set of collections
- A collection is a set of documents
- Compare with relational model: document --> record, collection --> table,
- JSON: {...} for document, and each document is made of a list of key-value pairs in the form "key: value"
- JSON: allows objects embedded inside an object as values
- JSON allows multi-values and uses [...] for an array or list of values
- JSON: format for storing and communicating object data by JavaScript
- BSON (binary encoded JSON) includes type extension: _id field, and Date values
- MongoDB Data Types: string, integer, double, Date, Array, ObjectId, binary, Null
- MongoDB use GridFS for large files (GridFS), replications to counter server failures, and sharding for big data I/O
- GridFS: how to load large files into MongoDB
MongoDB Installation: follow the link https://www.ecourse.org/news.asp?which=5020 for Windows installation and https://www.ecourse.org/news.asp?which=5343 for Linux.
Connect to MongoDB Servers
MongoDB Shell Access:
You will need to know the server host name (using --host), port number (using --port), user name (using -u), and password (using -p), and authentication database (using --authenticationDatabase_ to connect to a MongoDB server. Here is an example:
mongo --port 27017 --host ism.uakron.edu -u scott -p tiger --authenticationDatabase admin
Student Account on ism.uakron.edu: Each student in the University of Akron has been granted an account with read and write roles on Example, Homework and Files databases. The user name and password are the same as the ones for ecourse.org. They can use their own user name to replace scott and their own password to replace tiger in the above command.
To access local MongoDB databases in College of Business Labs, use the following command to have unlimited admin role:
mongo --port 27017 --host localhost -u admin -p password --authenticationDatabase admin
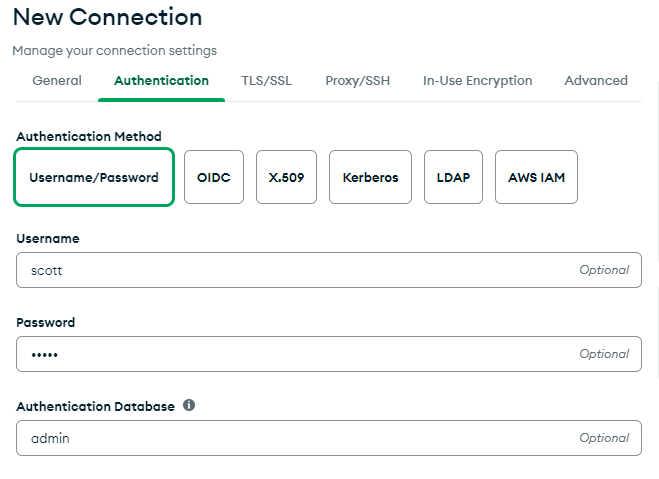
You may also use MongoDB Compass, a GUI tool, to connect to a MongoDB server and then open MongoDB shell to run queries. The following figures show how to set up a connection to scott/tiger account in ism.uakron.edu server:
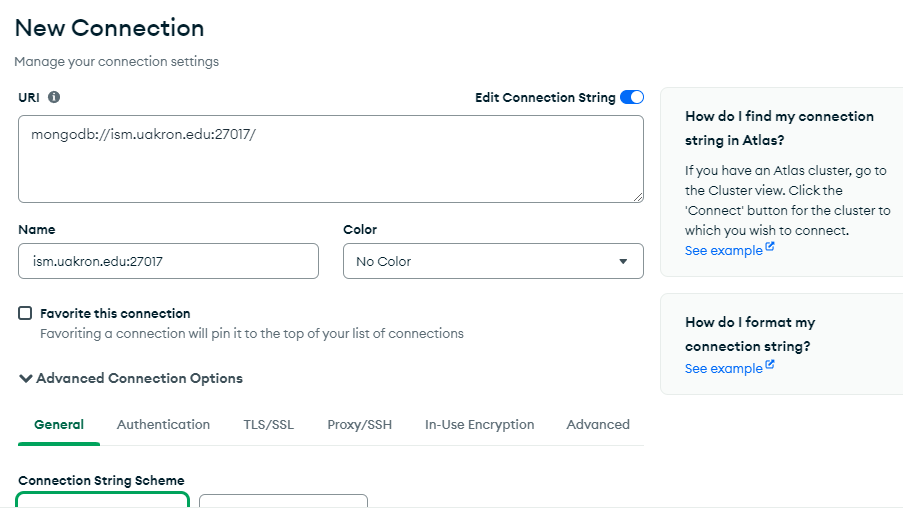
Select Advanced Connection Options and go to Authentication tab to enter user name, password, and authentication database. You should use your own account to replace username: scott and password: tiger.
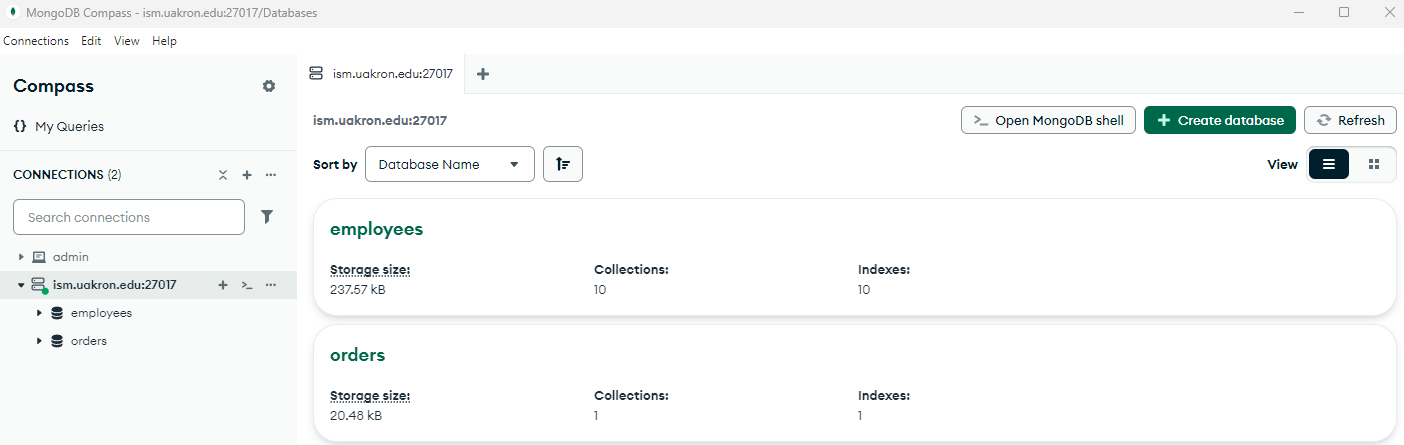
After your connection, you will see the following screen, press Open MongoDB Shell button to open an interactive JavaScript interpreter to run MongoDB commands.
- How to create/remove user accounts, change passwords, and grant roles (see PPT on MongoDB)
- How to lookup databases, collections, and documents
- How to insert new documents
- How to remove documents, collections, and databases
- How to rename a database and a collection
JavaScript: How to Format Date Values
There are two ways to insert a date value into a MongoDB document: use function ISODate() function and Date() constructor in JavaScript.
Here is an example document to use ISODate() function:
{
sid: 1234567,
sname: "John Doe",
date: ISODate('2001-12-31T12:01:15.123Z')
}
Here is an example document of using Date() constructor:
{
sid: 1234567,
sname: "John Doe",
date: new Date(2001, 12, 31, 12, 01)
}
Note that, new Date() will give the current system date and time if no specific year, month, day, etc. are specified.
In JavaScript, you can extract a part of a date value using getDate(), getDay(), getMonth(), getYear(), getFullYear(), getHours(), getMinutes(), getSeconds() functions.
var t = new Date();
hour = t.getHours();
if (hour < 12 ) print("good morining")
else print("good afternoon")
In order to insert Date() in MongoDB through Mongo shell, use the following syntax
var yourVariableName= new Date(year, month, day, hour, minute);
db.yourCollectionName.insertOne({yourDateFieldName:yourVariableName});
MongoDB: Create Documents
Let us first create a date variable
var creatingDate = new Date(2019, 03, 29, 13, 12);
Let us create a collection with documents:
db.Messages.insertOne({
    "UserName":"John",
    "UserMessages":["Hi","Hello","Awesome"],
    "UserPostDate":creatingDate
});
Following is the query to display all documents from a collection with the help of find() method
db.MEssages.find().pretty();
This will produce the following output
{
   "_id" : ObjectId("5c9d1b19a629b87623db1b21"),
   "UserName" : "John",
   "UserMessages" : [
      "Hi",
      "Hello",
      "Awesome"
   ],
   "UserPostDate" : ISODate("2019-04-29T07:42:00Z")
}
Here are two more examples to insert new documents into a collection:

db.names.insert({'name' : 'Don Draper'});
db.invenotry.remove({});
db.inventory.insertMany([
   { item: "journal", qty: 25, size: { h: 14, w: 21, uom: "cm" }, status: "A" },
   { item: "notebook", qty: 50, size: { h: 8.5, w: 11, uom: "in" }, status: "A" }
]);
MongoDB: Query Documents
The basic syntax of finding documents is
db.collectionName.find({query document},{projection document})
Query document specifies a query predicate indicating the documents you want to return, and a projection document specifies or restricts fields to return. Here are a few examples:
Example 1: Find all employee documents in employees collection with job title equals "MANAGER":
This operation corresponds to the following SQL statement:
Missing Value: Use null as expression for missing values
Example 2: Find all employee documents in employees collection with mgr is missing:
db.inventory.find({mgr: null})
To search documents with a text field value such as ename or job that starts, ends, and contains a letter, the filter document is formatted as follows (starts with power ^ and ends with money $):
{ename: /^J/}
{eanme: /G$/}
{ename : /I/}
MongoDB: How to Project Specific Fields in Queries
Sample Collection
db.inventory.insertMany( [
  { item: "journal", status: "A", size: { h: 14, w: 21, uom: "cm" }, instock: [ { warehouse: "A", qty: 5 } ] },
  { item: "notebook", status: "A",  size: { h: 8.5, w: 11, uom: "in" }, instock: [ { warehouse: "C", qty: 5 } ] },
  { item: "paper", status: "D", size: { h: 8.5, w: 11, uom: "in" }, instock: [ { warehouse: "A", qty: 60 } ] },
  { item: "planner", status: "D", size: { h: 22.85, w: 30, uom: "cm" }, instock: [ { warehouse: "A", qty: 40 } ] },
  { item: "postcard", status: "A", size: { h: 10, w: 15.25, uom: "cm" }, instock: [ { warehouse: "B", qty: 15 }, { warehouse: "C", qty: 35 } ] }
]);
Return the Specified Fields and the _id Field Only
A projection can explicitly include several fields by setting the 1 in the projection document. The following operation returns all documents that match the query. In the result set, only the item, status and, by default, the _id fields return in the matching documents.
The operation corresponds to the following SQL statement:
You can remove the _id field from the results by setting it to 0 in the projection, as in the following example:
The operation corresponds to the following SQL statement:
MongoDB: How to Update and Delete Documents
Sample Collection
db.names.insert({'name' : 'Don Draper'});
db.names.insert({'name' : 'Peter Campbell'});
db.names.insert({'name' : 'Betty Draper'});
db.names.insert({'name' : 'Joan Harris'});
Example 1: change name Don Drapper to Harry Johnson
db.names.updateOne({name:"Don Draper"},{$set:{name:"Hary Johnson"}})
// JS code: search for name property "Don Draper" and update via _id field
db.names.find().forEach(function(thisDoc) {
if(thisDoc.name === 'Don Draper'){
db.names.updateOne( { "_id": thisDoc._id}, {$set : { "name": "Harry Johnson"}});
};
});
Example 2: Delete document with name as Harry Johnson
db.names.deleteOne({name:"Don Draper"})
//JS: search for the document whose name property is: "Hary Johnson"
db.names.find().forEach( function(thisDoc) {
if(thisDoc.name === 'Harry Johnson'){
db.names.deleteOne({ "_id" : thisDoc._id });
};
});
MongoDB: Basic Mongo Shell Commands
Show Databases and Collections
To list all databases available, use "show dbs" command. To display the database you are using, type db as command. The operation should return test, which is the default database. To switch databases, issue the use helper, as in the following example:
You can switch to non-existing databases. When you first store data in the database, such as by creating a collection, MongoDB creates the database. For example, the following creates both the databasemyNewDatabase and the collection myCollection during the insertOne() operation:
The db.myCollection.insertOne() is one of the methods available in the mongo shell.
db refers to the current database.myCollection is the name of the collection.
If the mongo shell does not accept the name of a collection, you can use the alternative db.getCollection() syntax. For instance, if a collection name contains a space or hyphen, starts with a number, or conflicts with a built-in function:
The mongo shell prompt has a limit of 4095 codepoints for each line. If you enter a line with more than 4095 codepoints, the shell will truncate it.
Multi-line Operations in the mongo Shell
If you end a line with an open parenthesis ('('), an open brace ('{'), or an open bracket ('['), then the subsequent lines start with ellipsis ("...") until you enter the corresponding closing parenthesis (')'), the closing brace ('}') or the closing bracket (']'). The mongo shell waits for the closing parenthesis, closing brace, or the closing bracket before evaluating the code, as in the following example:
You can exit the line continuation mode if you enter two blank lines, as in the following example:
Tab Completion and Other Keyboard Shortcuts
The mongo shell supports keyboard shortcuts. For example,
-
Use the up/down arrow keys to scroll through command history. See .dbshell documentation for more information on the .dbshell file.
-
Use 'c':
Because there are many collection methods starting with the letter 'c', the 'c'.
Exit the Shell
To exit the shell, type quit() or use the
MongoDB: Exercises on Basic MongoDB Shell Operations
Create your database by inserting items
db.penguins.insert({"penguin": "skipper"})
db.penguins.insert({"penguin": "kowalski"})
Check if it is there:
> show dbs
local      0.078125GB
penguins   0.203125GB
Lets make that database the one we are on now
> use penguins
switched to db penguins
Print json:
> printjson({"foo":"bar"})
{ "foo" : "bar" }
Get the documents back:
> db.penguins.find()
{ "_id" : ObjectId("5498da1bf83a61f58ef6c6d5"), "penguin" : "skipper" }
{ "_id" : ObjectId("5498da28f83a61f58ef6c6d6"), "penguin" : "kowalski" }
We only want to find one row
> db.penguins.findOne()
{ "_id" : ObjectId("5498da1bf83a61f58ef6c6d5"), "penguin" : "skipper" }
Get the _id of that row:
> db.penguins.findOne()._id
ObjectId("5498da1bf83a61f58ef6c6d5")
Example loop, print all document _id:
> db.penguins.find().forEach(function (doc){ print(doc._id) })
ObjectId("5498dbc9f83a61f58ef6c6d7")
ObjectId("5498dbd5f83a61f58ef6c6d8")
Example loop, same as find(), print all the rows
> db.penguins.find().forEach(function (doc){ printjson(doc) })
{ "_id" : ObjectId("5498dbc9f83a61f58ef6c6d7"), "penguin" : "skipper" }
{ "_id" : ObjectId("5498dbd5f83a61f58ef6c6d8"), "penguin" : "kowalski" }
Drop the database when you are done:
> use penguins
switched to db penguins
> db.dropDatabase()
{ "dropped" : "penguins", "ok" : 1 }
Make sure it's gone:
> show dbs
local   0.078125GB
test    (empty)
Document Timestamps: Although MongoDB uses 64-bit for timestamps, but only the first 32-bit are essential. Thus, the ObjectID of each document consists of 4-byte timestamp, 5-byte random number, and 3-byte serial number. To get the timestamp of a document, use ObjectID.getTimestamp() function.
Get an ISODate:
> ISODate("2013-03-01")
ISODate("2013-03-01T00:00:00Z")
Get the timestamp from the _id object:
> db.penguins.findOne()._id.getTimestamp()
ISODate("2014-12-23T02:57:31Z")
Get the timestamp of the last added record:
db.penguins.find().sort({_id:-1}).limit(1).forEach(
    function (doc){
        print(doc._id.getTimestamp())
     }
)

Tue Dec 23 2014 03:04:53 GMT+0000 (UTC)
Loop, get the system date:
db.penguins.find().forEach(
    function (doc){
        doc["timestamp_field"] = new Date();
        printjson(doc);
    }
)

{
        "_id" : ObjectId("5498dbc9f83a61f58ef6c6d7"),
        "penguin" : "skipper",
        "timestamp_field" : ISODate("2014-12-23T03:15:56.257Z")
}
{
        "_id" : ObjectId("5498dbd5f83a61f58ef6c6d8"),
        "penguin" : "kowalski",
        "timestamp_field" : ISODate("2014-12-23T03:15:56.258Z")
}
Loop, get the date of each row:
db.penguins.find().forEach(
    function (doc){
        doc["timestamp_field"] = doc._id.getTimestamp();
        printjson(doc);
    }
)


{
        "_id" : ObjectId("5498dbc9f83a61f58ef6c6d7"),
        "penguin" : "skipper",
        "timestamp_field" : ISODate("2014-12-23T03:04:41Z")
}
{
        "_id" : ObjectId("5498dbd5f83a61f58ef6c6d8"),
        "penguin" : "kowalski",
        "timestamp_field" : ISODate("2014-12-23T03:04:53Z")
}
Filter down to just the dates
db.penguins.find().forEach(
    function(doc){
        doc["timestamp_field"] = doc._id.getTimestamp();
        printjson(doc["timestamp_field"]);
    }
)

ISODate("2014-12-23T03:04:41Z")
ISODate("2014-12-23T03:04:53Z")
Filter down further for just the strings:
db.penguins.find().forEach(
    function(doc){
        doc["timestamp_field"] = doc._id.getTimestamp();
        print(doc["timestamp_field"])
   }
)

Tue Dec 23 2014 03:04:41 GMT+0000 (UTC)
Tue Dec 23 2014 03:04:53 GMT+0000 (UTC)
Print a bare date, get its type, assign a date:
> print(new Date())
Tue Dec 23 2014 03:30:49 GMT+0000 (UTC)
> typeof new Date()
object
> new Date("11/21/2012");
ISODate("2012-11-21T00:00:00Z")
Convert instance of date to yyyy-MM-dd
print(d.getFullYear() + "-" + (d.getMonth()+1) + "-" + d.getDate())
2014-1-1
get it in yyyy-MM-dd format for each row:
db.penguins.find().forEach(
    function(doc){
        d = doc._id.getTimestamp();
        print(d.getFullYear() + "-" + (d.getMonth()+1) + "-" + d.getDate())
     }
)
2014-12-23
2014-12-23
Convert to Local Dates:
db.penguins.find().forEach(
    function (doc){
        d = doc._id.getTimestamp();
        print(d.toLocaleDateString())
    }
)

Tuesday, December 23, 2014
Tuesday, December 23, 2014
Get each row in yyyy-MM-dd HH:mm:ss format:
db.penguins.find().forEach(
    function(doc){
     d = doc._id.getTimestamp();
     print(d.getFullYear() + "-" + (d.getMonth()+1) + "-" + d.getDate() + " " + d.getHours() + ":" + d.getMinutes() + ":" + d.getSeconds())
   }
)

2014-12-23 3:4:41
2014-12-23 3:4:53
Get the date of the last added row:
> db.penguins.find().sort({_id:-1}).limit(1).forEach(function (doc){ print(doc._id.getTimestamp()) })
Tue Dec 23 2014 03:04:53 GMT+0000 (UTC)
MongoDB: GridFS

GridFS is the MongoDB specification for storing and retrieving large files such as images, audio files, video files, etc.
It is kind of a file system to store files but its data is stored within MongoDB collections. GridFS has the capability to store files even greater than its document size limit of 16MB.
GridFS divides a file into chunks and stores each chunk of data in a separate document, each of maximum size 255k.
GridFS by default uses two collections fs.files and fs.chunks to store the file's metadata and the chunks. Each chunk is identified by its unique _id ObjectId field. The fs.files serves as a parent document. The files_id field in the fs.chunks document links the chunk to its parent.
Following is a sample document of fs.files collection −
{
   "filename": "test.txt",
   "chunkSize": NumberInt(261120),
   "uploadDate": ISODate("2014-04-13T11:32:33.557Z"),
   "md5": "7b762939321e146569b07f72c62cca4f",
   "length": NumberInt(646)
}
The document specifies the file name, chunk size, uploaded date, and length.
Following is a sample document of fs.chunks document −
{
   "files_id": ObjectId("534a75d19f54bfec8a2fe44b"),
   "n": NumberInt(0),
   "data": "Mongo Binary Data"
}
Adding Files to GridFS
Now, we will store an mp3 file using GridFS using the put command. For this, we will use the mongofiles.exe utility present in the bin folder of the MongoDB installation folder.
Open your command prompt, navigate to the mongofiles.exe in the bin folder of MongoDB installation folder and type the following code −
>mongofiles.exe -d gridfs put song.mp3
Here, gridfs is the name of the database in which the file will be stored. If the database is not present, MongoDB will automatically create a new document on the fly. Song.mp3 is the name of the file uploaded. To see the file's document in database, you can use find query −
>db.fs.files.find()
The above command returned the following document −
{
   _id: ObjectId('534a811bf8b4aa4d33fdf94d'),
   filename: "song.mp3",
   chunkSize: 261120,
   uploadDate: new Date(1397391643474), md5: "e4f53379c909f7bed2e9d631e15c1c41",
   length: 10401959
}
We can also see all the chunks present in fs.chunks collection related to the stored file with the following code, using the document id returned in the previous query −
>db.fs.chunks.find({files_id:ObjectId('534a811bf8b4aa4d33fdf94d')})
In my case, the query returned 40 documents meaning that the whole mp3 document was divided in 40 chunks of data.
Optional: Secured Access to Replicas MongoDB Shell
The mongo shell is an interactive JavaScript interface to MongoDB. You can use the mongo shell to query and update data as well as perform administrative operations.
The mongo shell is included as part of the MongoDB Server installation. Once you have installed and have started MongoDB, connect the mongo shell to your running MongoDB instance.
Connect to a MongoDB Replica Set
To connect to a replica set:
-
You can specify the replica set name and members in the connection string.
-
If using the DNS Seedlist Connection Format, you can specify the connection string:
Note that use "+srv" connection string modifier automatically sets the ssl option to true for the connection.
-
You can specify the replica set name and members from the --host <replica setname>/:,:,... command-line option. For example, to connect to replica set named replA:
TLS/SSL Connection
For TLS/SSL connections,
Homework:
Reading: Model document relations in MongoDB (https://www.ecourse.org/news.asp?which=5342)
Correctness Questions: online at ecourse.org
Hands-on Questions (copy both the question number and the question before each answer):
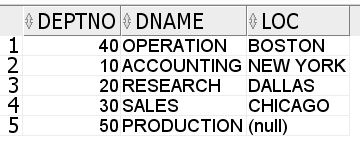
1. Follow the reading materials and write scripts to create collections for the data in the following relational model:
2. Find the document with ename as JONES
3. For all the documents inserted by Question 1, find their timestamps
4. Find the last three employees documents inserted in Question 1
5. Find the ObjectID of all the documents in the employees collection created in Question 1
6. Find the ename, hiredate, and job fields of all the documents in the employees collection in Question 1
7. Find the top three salary makers in the employee collection
8. Find the first five employees hired by the company
9. Create a new user account with readWrite permission for your database
10. Find the last document you inserted into the employee collection
|
